GoHighLevel Blog
Step by Step instructions for common how to in your all-in-one Marketing CRM System King Pixel built on GoHighLevel

How to create a screening funnel in GoHighLevel
“Quality is more important than quantity.” - Steve Jobs
How to create a backend screening funnel in GohighLevel to improve the quality of leads booking discovery calls in your diary.
Here are the step by step instructions:
When creating a back end funnel, there are 4 funnel steps to build
Go to Sites → funnels → create a new funnel (blue button on the upper right side) and select from blank and rename your funnel.
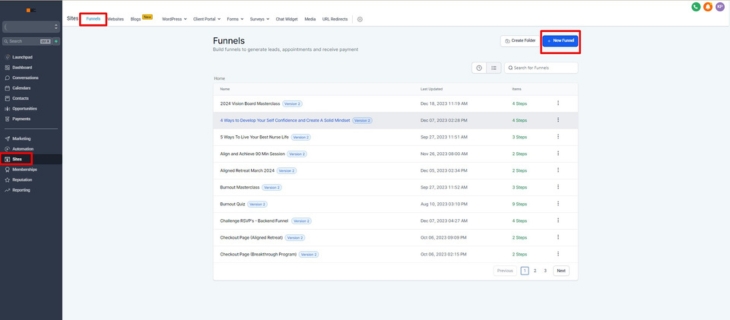
To create a new funnel design from scratch using a funnel builder. Select from blank, and name your funnel then click create.
Once renamed, find your newly created funnel and click the edit button.
When adding a new step, click the green button.
Once clicked, name the 1st page as Survey Page and the path as (i.e /survey-page). Click create funnel.
To start editing, select the create from blank.
Click the plus (+) button to add a section, select the full width, and drag it to the center to be added.
Click the (+) sign at the center to add a row., then select how many columns you would want to add. Drag it to the center. (inside the green box section)
To add an image section, click the (+) sign on the left side and select the image. Customize it on the right side of the page.
To add an image, click the button on the right and upload it. Input width to adjust the size and always put the business name on the Alt Text (For SEO).
To add a headline, select the headline element and drag to the center. Update the fonts, colors according to the branding. When adding for the body, select the paragraph element. Customize the text by changing the branding.
To add a survey, go to the elements, select the element and drag. When customizing, go to the right side of the builder, select from the drop down which survey you will use. For the button actions, select Use action from survey builder.
When adding more sections, put the cursor where it points to a green frame and click the (+) sign and select full width and drag. Click the (+) sign at the center to add rows and select how many columns you would like to add (blue (+) sign). Click each column to add elements according to preference (orange (+) sign).
For the footer section, you can add another section, add elements. You can also change the background color for emphasis.
When adding a link to the text, i.e privacy policy, highlight the text and click the link button. Insert the URL funnel and always open link in a new window, tick the box [include ’nofollow’ in hyperlink]. Then click save.
Check the mobile version and the desktop version of the funnel always. Edit content for the mobile version if possible. Once done, click the save button before press the back button and add another funnel.
To add another page click the add new step.
For the booking step, create a headline then a body and insert a progress bar. Click the element and update the names and the branding.
To add the calendar below the progress bar, click the elements on the left side, go to customs and select the calendar. Update the settings and select from the drop down menu for the discovery call calendar. For the button actions, always Use action builder from the calendar. Click the save button.
Add the third step, the confirmation page. This is the page where the calendar is redirected. It is where you confirm the schedule of the client. You can add testimonials here and a footer.
The last step is the dud confirmation page. The client will be redirected here if they don’t meet the qualifications in the survey form. You can suggest the client to your socials so that next time they can come back if they are already fit for the offer that they want to avail.
Go back to the launch checklist and click publishing. Set the step path to /name. Put (-) instead of a space between texts.
Always check the branding, and the small details.
Ready to Meet Our GoHighLevel VA Service?
Experience the ease and effectiveness of digital marketing done for you with King Pixel's GoHighLevel VA service. We promise a seamless integration of your promotional ideas into impactful, tangible marketing solutions, all skilfully created within the robust framework of System King Pixel.
Entrust us with your day-to-day digital marketing needs, freeing you to focus entirely on growing your business and doing what you do best.
Book your discovery call and unpack our GoHighLevel VA service monthly packages.
Done for you
marketing services
As an outsourced marketing partner, we're here to help you to stop the overwhelm of doing everything in your business, leaving you to concentrate on what you do best.


Content Strategy
From crafting engaging email sequences, effective email and SMS marketing campaigns, building landing pages, creating visually appealing graphics, and developing compelling messaging, we create what you need to promote your business.

Marketing CRM
Operate with one source of the truth for leads and client communication with our all in one marketing CRM and automation software. Save time, increase your conversion and grow your business without having to hire more admin staff.

Paid Advertising
Turn the tap on for lead generation marketing through paid ads including Meta advertising (Facebook and Instagram), TikTok ads, LinkedIn ads, Google ads and more. Flood your business with a stream of new leads and grow to the next level.





Access the webinar replay for a break down of the LCA Method to approaching marketing automation
